Optical measurement method

confovis · Solutions · Surface metrology · Optical measurement method

Optical measurement method - the patented solution of Confovis

The patented Structured Illumination Microscopy (SIM) is the simplest and most robust optical method for artifact-free measurement of demanding surfaces.

In contrast with confocal methods with pinhole disc or laser, there are no scattered light effects and no coherence effects. Due to the highly dynamic nature of this method, even highly reflecting surfaces can be measured artifact-free. Even the most difficult measurement tasks such as diamond surfaces or nitrocarburized surfaces are analyzed at high resolution and 3D.

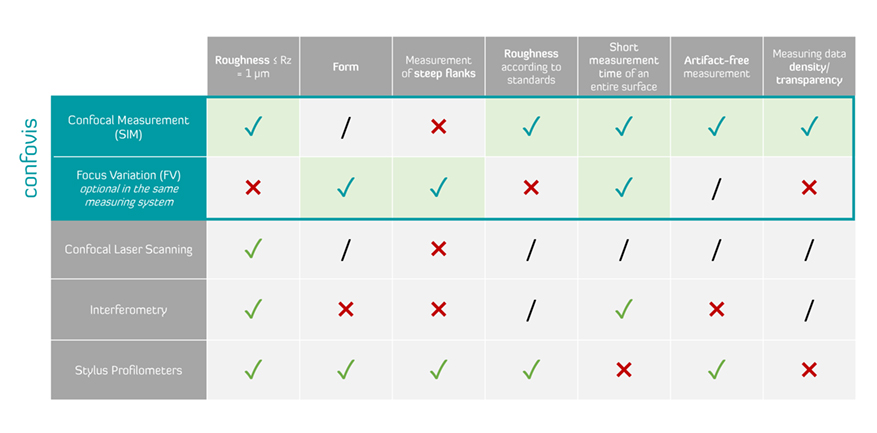
The surface material does not have to be known for a reliable measurement, which makes the optical measurement method of Confovis different from other optical measurement techniques (such as white light interferometry or chromatic confocal measurement methods).

Tactile and optical measurement methods in comparison with Confovis

An optical 3D measuring method with many advantages

  • Measurement of various surfaces and materials; including reflecting and transparent layers
  • Artifact-free measurements of demanding surfaces (no bat wings)
  • Focus variation as additional measurement method for form and very rough surfaces
  • Full data transparency: Each data point can be evaluated. The data quality of each individual measuring point is transparently available to the user.
  • Maintenance-free: No moving parts, therefore no readjustment required. The total cost of ownership is therefore significantly lower than with other systems.
  • High-precision measurement technology: confocal with high vertical resolution < 3 nm (VDI 2655)

Structured Illumination Microscopy - a high-precision optical measurement method

The patented SIM measuring method uses LED light and scans the surface topography as an area. As opposed to laser-based methods, there are no speckles  or coherence effects, so that roughness, for example, is measured and evaluated without filtration (according to VDA 2006) and traceable to the standards DIN EN ISO 4287/88, DIN EN ISO 13565 and DIN EN ISO 25178. In addition, the measuring speed is considerably higher due to the acquisition of area and is not limited by movable and mechanical components (pinhole disc or galvo mirror) as it is the case with established confocal methods.

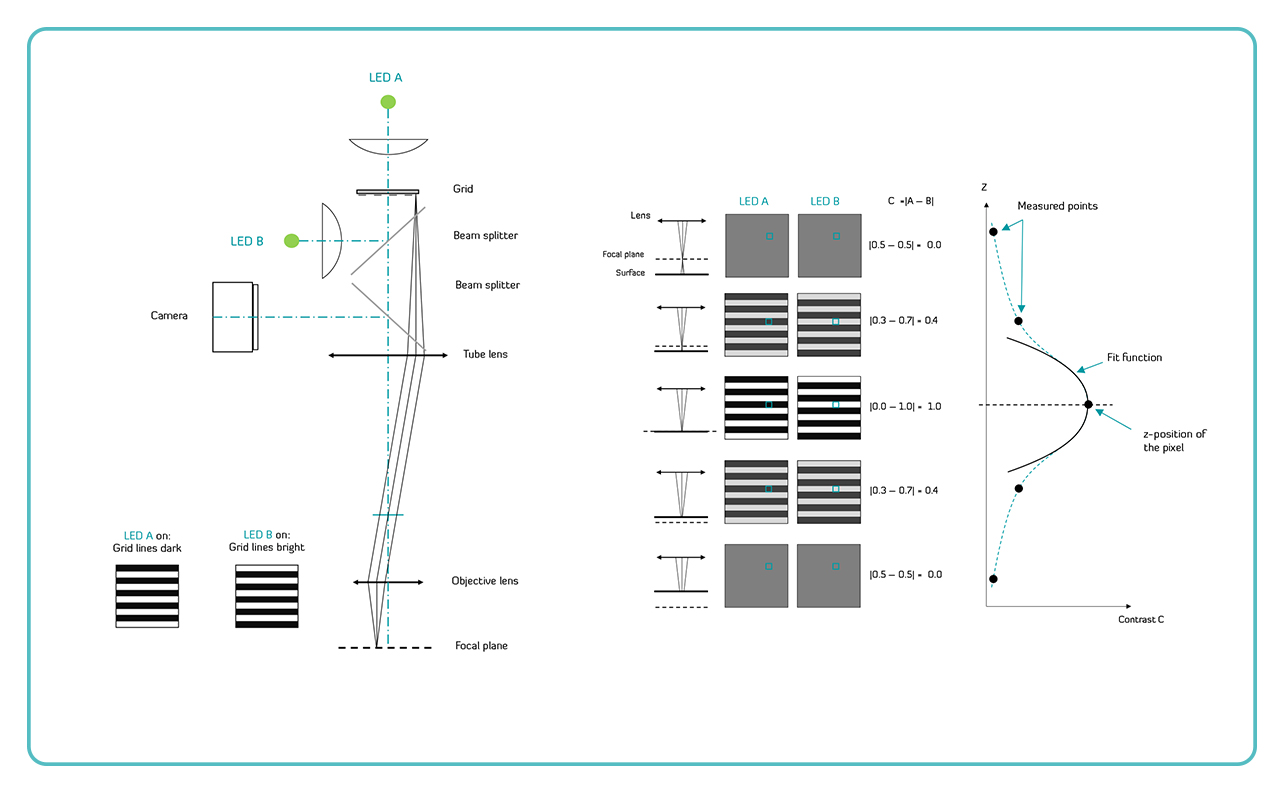
During the confocal measurement with the SIM method, both LEDs (LED A and LED B) are actuated alternately, which causes the focus to move through the topography. When LED A is activated, the grid is imaged by transmission into the focal plane (see “LED A on“). LED B is then activated and the grid is imaged into the focal plane by reflection on the chrome-plated bars using beam splitters (see “Illumination B on“). The image sensor thus captures the surface with the imaged grid, whereby two 180° phase-shifted images are generated during movement through the topography.

The measuring result is obtained by calculating the difference in contrast between the two images. A Point Spread Function (PSF) is generated for each measuring point, from which the z coordinate is determined by Gaussian fit. Subsequently, a multi-stage quality filter is applied to ensure that only measuring points of high data quality are included in the evaluation.

Extension of the optical 3D measurement method with focus variation

When measuring contours with large flank angles, focus variation supplements the optical measuring method from Confovis. Unlike the confocal measuring technique, which creates an artificial contrast on the surface, focus variation only uses the contrast of the surface itself.

In all confocal measurement methods, both illumination and measurement are performed coaxially through the lens of the microscope objective. With focus variation, the specimen is additionally illuminated by a ring light. The advantage is that, independent of the numerical aperture of the lens (and thus also of the magnification), flank angles above 80° can be captured. The microgeometry (roughness) of surfaces with low contrast cannot be determined by focus variation alone.

Both methods are available to the Confovis user for his measurement task.

>> More about the combination of confocal microscopy and focus variation with Confovis measuring systems

ARE YOU LOOKING FOR A SOLUTION FOR YOUR APPLICATION?

CONTACT US!

    *Required
    I hereby confirm that I have read the privacy policy.

    confovis GmbH